Spinning for Cheezy Baked Vegan “Ziti”

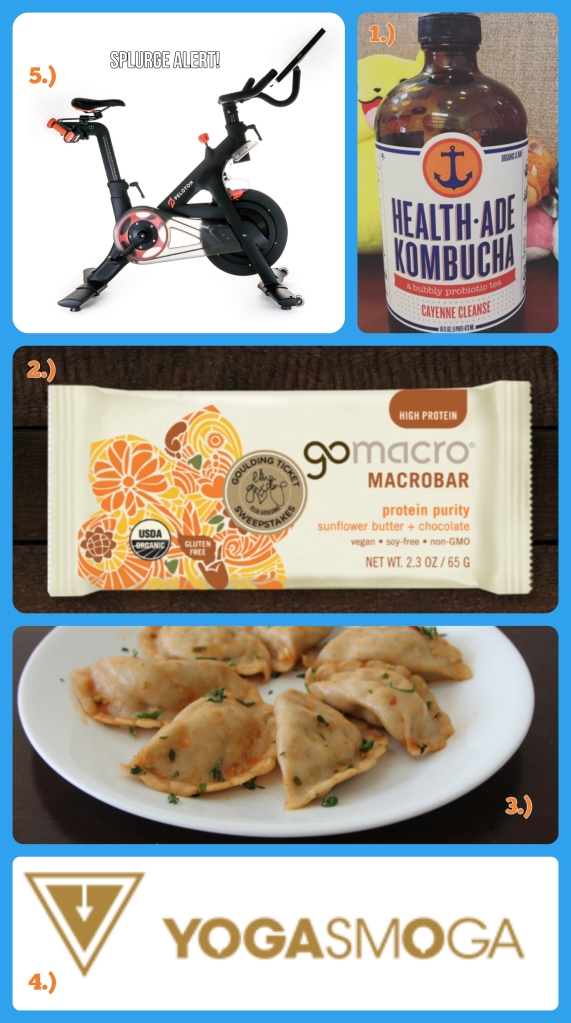
Continuing on from my last post… I am still beaming with excitement and enthusiasm over my new Peloton spin bike!

I’ve always enjoyed the after effects of exercise because nothing feels better than completing a tough workout and knowing that you’ve done something marvelous for yourself from the inside and out. Looking good doesn’t hurt either! The problem that occasionally creeps up on me is motivating myself to get going. Each morning I awaken to the sound of one of those obnoxious ringtones on my phone alarm followed by my dogs jumping up and down on my stomach because they are ready to E-A-T. I wonder who they could get that from? Hehe… Next, we all trudge downstairs and go through our typical morning routine that used to include giving myself a pep talk to exercise (or maybe a guilt trip?), and every once in a while I’d reason with myself that I would be better off with a little more sleep.

Since the Peloton arrived this hasn’t been the case at all! The pups and I still have our morning ritual, but I no longer have to remind myself of all the reasons why I want to exercise rather than catch a few extra zzz’s. I now find myself surprisingly giddy to wake up and jump on the spin bike every morning (I’ve actually been heading to bed early just so I can wake up earlier)! So much so that lately I’m needing to consciously remind myself to calm my mind when I go to bed otherwise, I’ll never be able to wake up in time, ha! It’s so much fun to escape to a different place through exercise, the music and with friends that encourage you along the way. While all of the instructors are incredible and push every rider to their very best, each one brings a little something different to the table. If you’re channeling your hip hop self today then maybe you’ll want to jump on and ride with Alex. Feeling more rock and roll? Then jump on with Jenn! Feeling like a badass? Try a session with Robin! Need a little more zen in your ride today? Join one of Nicole’s rides! If you’re wanting to train like a pro then spend some time in Steven’s classes. There are even more amazing instructors that I haven’t gotten the chance to spend quality time on the bike with yet, but I know they will be just as inspiring, motivating and all around awesome as the others. I feel as if I can never get bored on this bike because there are so many options of rides to choose from. I’m struggling to catch up on all of the rides I want to try in a reasonable amount of time! If I’m not feeling up to snuff one day for a full blown 45 minute workout then I know I can at least scrape through a 15-20 minute one. The great thing is I know when I come out on the other side of that workout that I’m going to feel completely amazing. There are some rides designed specifically for recovery days if you want to take it easy, but still have some quality time with your bike, a coach and the community.

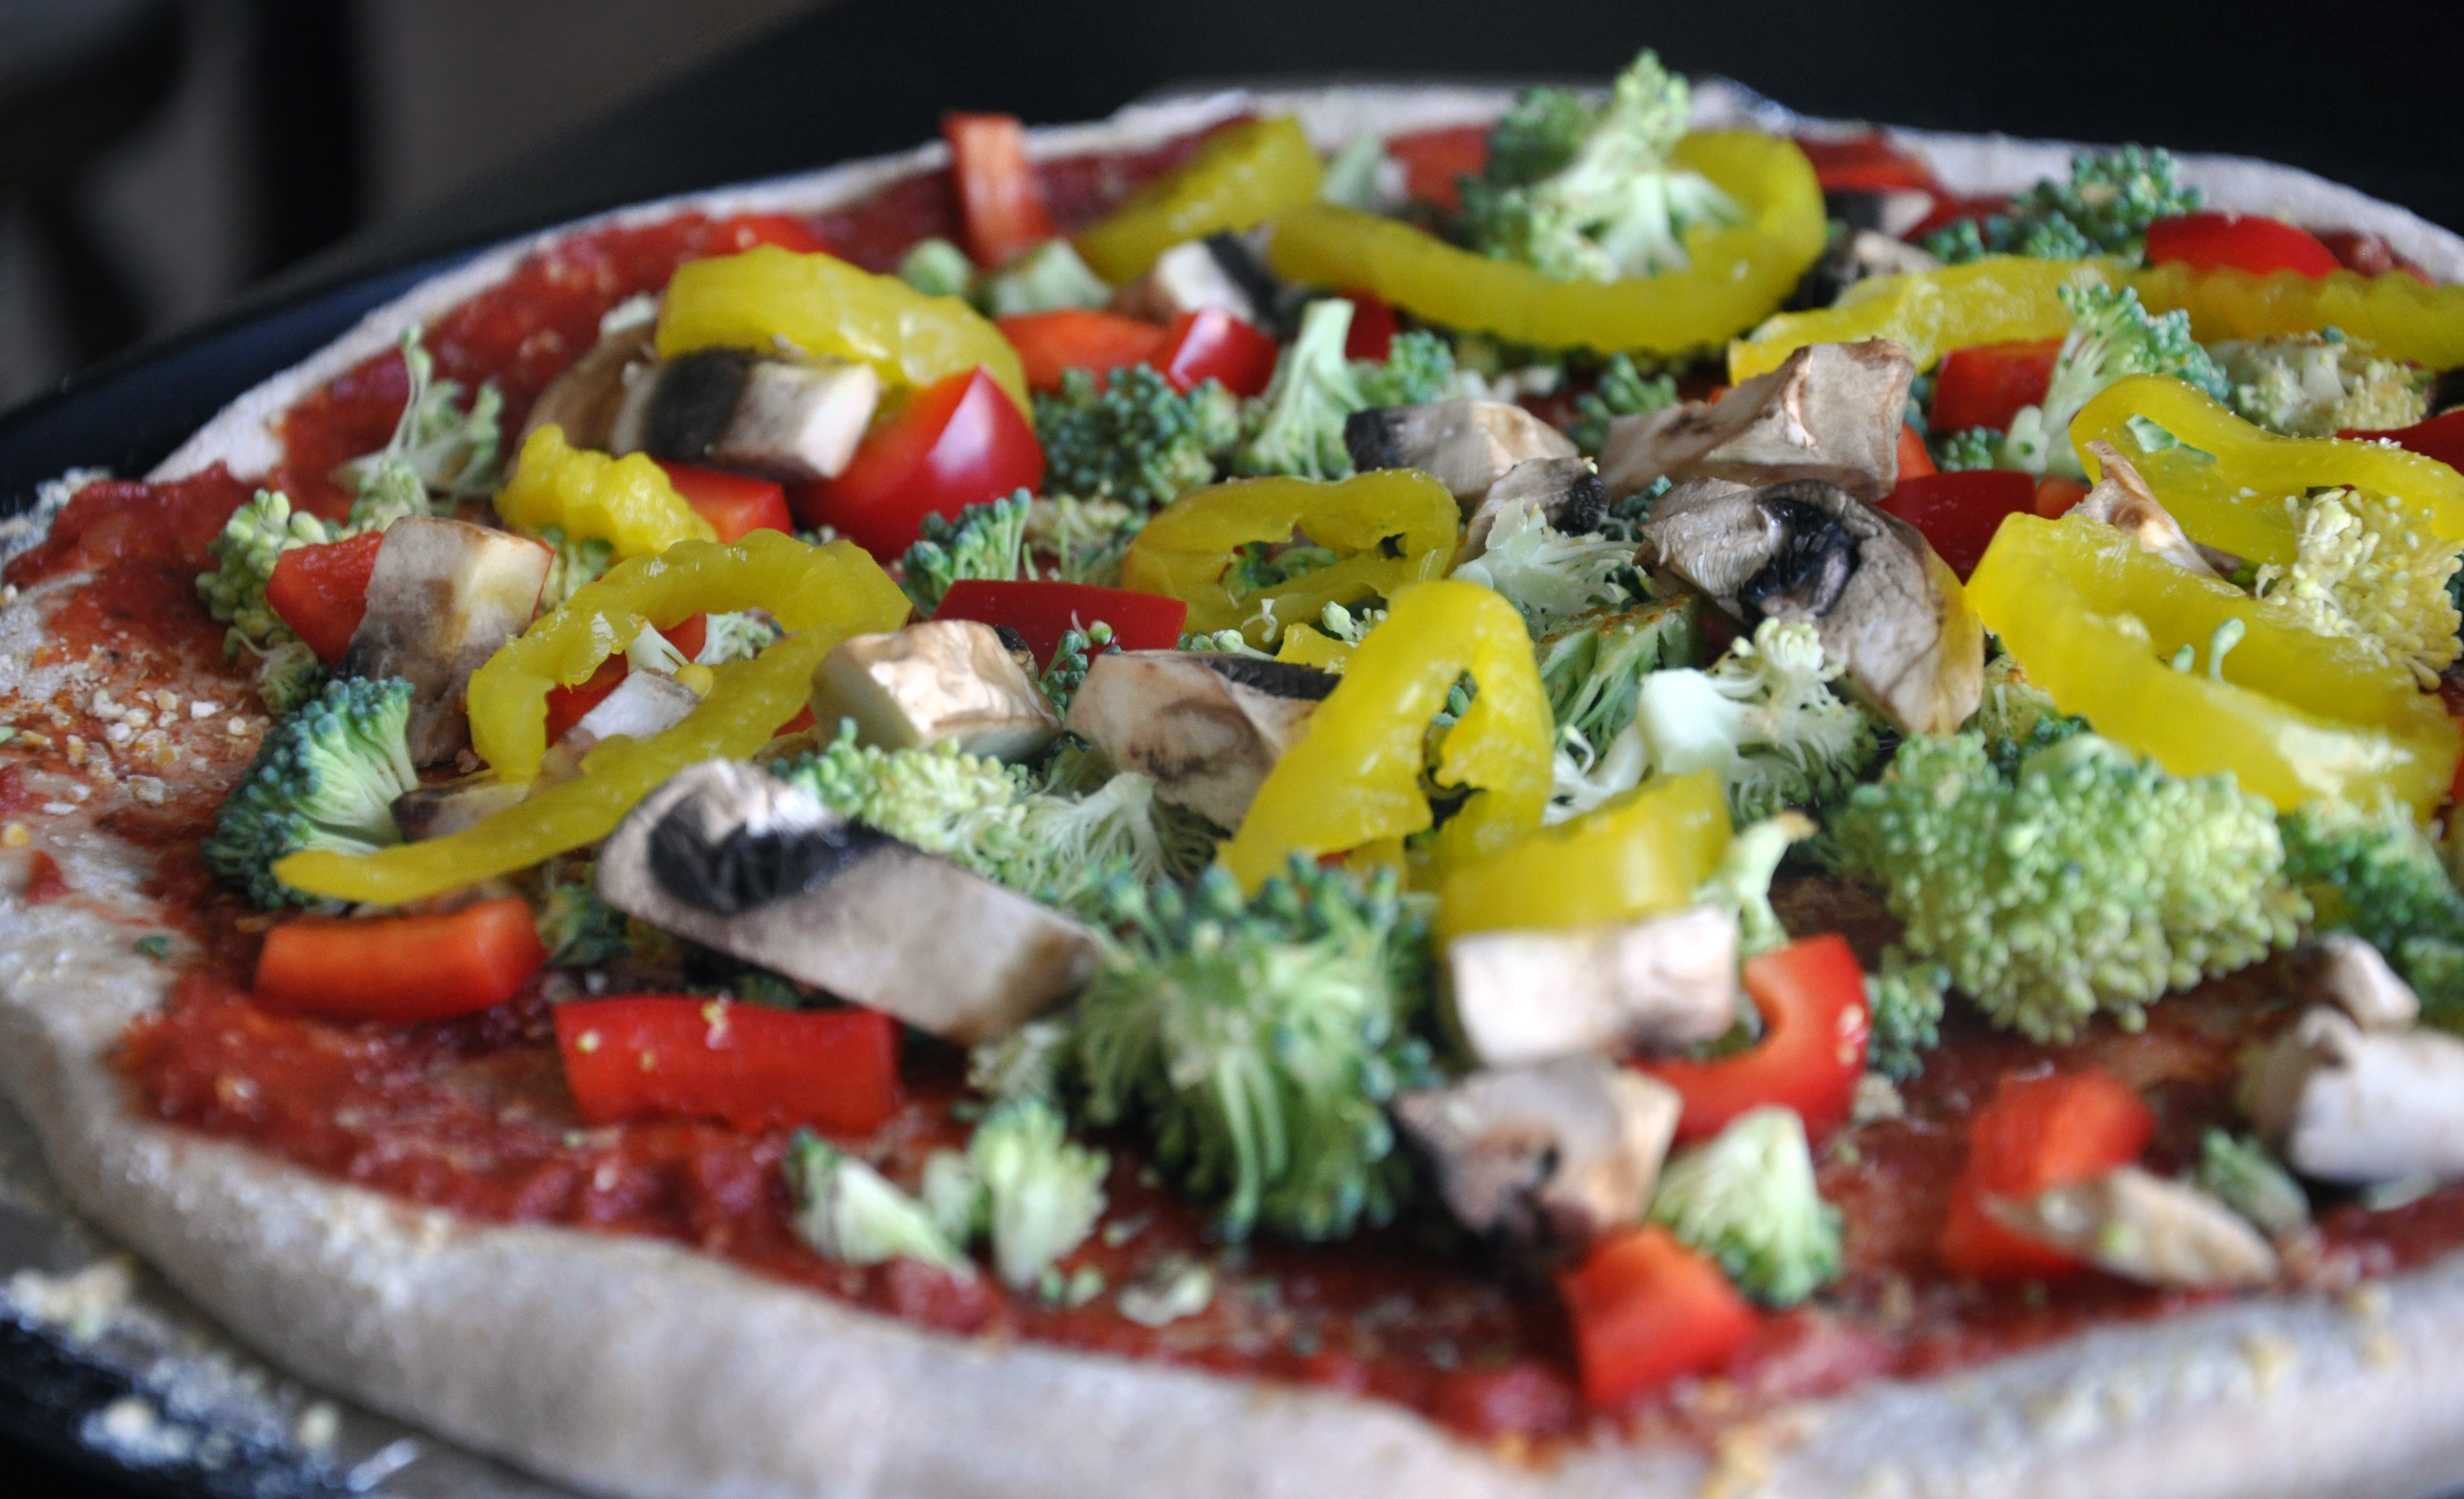
This brings me to the main reason for this post. Within the last couple of weeks I have experienced a vast amount of joy by connecting with, sharing, and getting to know the fellow Peloton riders that make up this truly special community. Most of the group members are positive, uplifting, and cheerleaders to one another. Not only is it comforting to have a group of friends that are constantly cheering you on, but they also understand the addiction that is Peloton. I recently joined an accountability sub group with a number of Peloton Ladies created solely with the intention of helping each other work towards, reach and maintain fitness/wellness goals. With this pack of wonderful gals staying healthy and fit somehow turned into a fun mini game of life! For a goal of 6 total days a week we’re encouraged to post 1 picture of a physical activity we completed along with 1 picture of a healthy meal or snack. This, of course, is where my current blog post stemmed from. I figured, why not share some of the healthy dishes that I make on a regular basis? I often talk myself out of posting recipes thinking there’s no point in sharing a recipe unless it’s flashy and exciting. Sometimes its tough to remember that the basics are just as exciting if they are delicious! For my first night of this challenge my healthy meal is “Baked Ziti”, but it’s really only inspired by traditional baked ziti.

Being a California girl, with no Italian blood to be found in my lineage, I had never heard of Baked Ziti prior to moving to PA. My husband (then boyfriend) quickly changed that! Once he introduced me to the dish I quickly grew to love indulging in the warm, comforting and gooey pile of pasta. Over the years I have since morphed that original recipe into something much more nutritious and a whole lot less fatty!

Baked “Ziti”

IMG_1411

Ingredients:

Filling:

• 16 oz. package sprouted whole grain pasta (I usually use penne even though this is called baked ziti; just use whatever your family prefers!)
• 1 jar of pasta sauce (about 20-24 oz. since they vary depending on the brand you buy)
• 2 bell peppers
• 1 ½ cups baby bella mushrooms
• 1 cup faux meat crumbles*
• ¼-1 tsp. dried basil, to taste
• ¼ – 1 tsp. dried oregano, to taste
• ¼ – tsp. red pepper flakes, to taste
• Salt and pepper, to taste

*Note: I’ve used everything from cooked brown lentils, Gardein “Meat” crumbles, Veggie Sausage slices, Crumbled Veggie Burgers to TVP (Textured Vegetable Protein). The recipe works even if you leave this out, but it does add a bit more “oomph”.

No-Cheese Sauce:
From the Engine 2 Diet

• 1/3 cup cashews
• 1/2 cup water
• 4 oz. roasted red bell pepper (found in jars in the veggie aisle)
• 1 tsp. garlic powder
• 1 tsp. onion powder
• ½ tsp. pink Himalayan salt (I use this because it doesn’t raise blood pressure the way that regular salt does, but use whatever you have on hand!)
• 1 onion
• 1/3 cup nutritional yeast
• The juice of 1 lemon

Directions:

Filling:

1.) Cook pasta according to package, drain, and set aside.
2.) Sauté peppers, mushrooms, and faux meat crumbles (if using) until the veggies are soft (about 8-10 minutes). Sprinkle in the spices, if using.
3.) Add jar of sauce and cooked pasta to your veggie “meat” mixture and stir until fully combined.
4.) Pour this filling into a 9×13” inch pan (or whatever you’re using – as long as it fits!)
5.) Pour “cheese” sauce on top of pasta filling then sprinkle smoked paprika over the top.
6.) Bake at 425 for 20 minutes.

Cheese Sauce:

1.) Place all ingredients into a blender/food processor and blend until smooth. If you don’t have a high-powered blender like a Vitamix just soak the cashews for a few hours on your counter, then drain them before using – it helps the sauce to come out super creamy!

*Note: I use this cheese sauce on many different things. I use this same sauce for my enchiladas, but to alter it just a bit I add some red pepper flakes, chili pepper, and Tabasco sauce. I’ve even used this to make baked nachos, and the results were phenomenal!

** Since I had a few globs of Miyoko’s Kitchen FreshMozz sitting in my refrigerator I topped this version with that and fresh basil. I’ve made this dish plenty of times without either of these garnishes, and it was just as yummy 🙂

These are a few of my favorite things~🎶 April 2016

I certainly need to set aside more time for creating posts here. I was hoping to experiment and make some interesting recipes to share, but I came down with a pretty nasty stomach bug that, for the first time in my life, completely zapped my appetite. I have suffered from nausea for various reasons throughout the years, but this was the first time that I was repulsed at the thought of food (and coffee *gasp*!) for days. Normally I live to eat – I’ll be eating one meal while day dreaming about the next. I’m one of those people that loves falling asleep at night because I know that breakfast will arrive that much sooner. Once the worst part of the “bug” had left my body I immediately returned to eating my normal diet, and I think that mistake prolonged whatever ickiness had invaded my body. I finally wised up and put myself on the same sort of bland diet my puppy dogs go on when they have tummy issues, and within a few days I was feeling much better. If it works for the fur babies why shouldn’t it work for me? It’s funny how I get so worried about upsetting their little stomachs that I immediately whip up batches of safe recovery food for their tummies, but for myself I figured I could just tough it out.

On the bright side something positive did come from this whole fiasco. I came to truly appreciate good health, specifically the ability to exercise. While I was sick I felt as if all of my energy was being used fighting to get well, and I found myself begging my body (along with any sort of higher power out there) to cure me as soon as possible so that I could return to exercise. Instead of being upbeat and positive I was feeling very glum, gloomy and anxious. I knew that if I could manage to muster up enough energy to go for a run I would feel a lot better mentally, but my body just wasn’t cooperating.

As soon as I started slowly incorporating exercise back into my life I immediately felt my mind clearing, I was much more energetic and overall felt happy again. I was hesitant to eat anything with spice, acidity or fat since it had such negative effects on me while recovering. Slowly, I introduced these back into my diet as well, and now I’m feeling great again! Prior to becoming sick I was finding it difficult to wake up each morning to exercise before work. Since my health has returned I have been extremely grateful and excited to wake up and get moving!

Since I haven’t had much time or the appetite for recipe experimentation as of late I thought it would be fun to share a list of things that I’m obsessed with right now.

FAVTHINGSAPRIL2016

1.) Health-Ade Kombucha ($5~/ea)

I knew that my gut needed some good bacteria reintroduced to it since all of the bad bacteria had taken over and kicked them out. If you’ve never had Kombucha before it’s wonderful because it contains probiotics, B-vitamins, enzymes and has a lovely natural effervescence (think healthy champagne!). I purchased a few different flavors of Health Ade’s Kombucha, and they are all delicious! While I was sick I preferred the Pink Lady Apple, but now that my tummy’s in shape again for spice I’m really digging the Cayenne Cleanse!

2.) GoMacro Bars ($3~/ea)

Serving portions were an issue for me while recovering, and once I graduated from plain Ezekiel bread I decided to munch on GoMacro bars because of their high nutrient profile in a concise package. All sorts of flavors here as well, but my favorites are Protein Purity (Sunflower butter/Chocolate), Protein Replenishment (Peanut Butter) and Cherries & Berries (self explanatory!).

3.) Macrovegetarian Shanghai Dumplings ($5~/container)

It’s always exciting to me when I find something that’s equally delicious as it is nutritious, and that’s exactly what all Macrovegetarian products are. This particular dumpling has a bit of spice from the ginger, crunch from cabbage and a “meaty’ texture because of the mushrooms. I love buying these in bulk, separating them into multiple containers to freeze and then defrosting them to bring for quick and healthy work lunches.

4.) YOGASMOGA Gear ($50-$250)

Oh my, where to begin… What could be better than high quality athletic gear that cares about you and the environment? I began with a pair of cropped leggings (which are by far the most comfortable athletic leggings I have ever purchased, by the way), and the addiction has continued to grow from there. After a couple of months I find myself a proud owner of a tank, tee, long sleeve tee, sweater, bra, multiple shorts, crops and I see a jacket in my future! I have a problem, don’t I? Ha! These items are about the same price as brand competitors (Lulu, Beyond Yoga, Athleta, etc..), but the quality is ah-may-zing! I’ve done spin class, pilates and ran all in the same pair of crops without any pilling or stretching – a yoga pants miracle I tell you! A nice added bonus is for every item you purchase you receive “SMOGI Bucks” which can be used towards future purchases. You receive 25 SMOGI Bucks to use towards your first online order too, which is great!

PS- These are made completely in the USA, yay!

5.) Splurge Alert (!): Peloton Exercise Bike ($1995 + $39/mo Subscription)

Ok ok, I realize not everyone will be able to go out and buy one of these puppies tomorrow, but if you can I highly recommend it! It’s definitely worth saving up for! This is the best piece of exercise equipment I have ever used, and I couldn’t be happier with my purchase. This is obviously a big investment, but the payoff in your physical fitness makes it more than worth your while. I’ve always been an active person, but this excites me for physical activity in a whole new way. The Peloton system allows you to bring spin class into your own home, rain or shine and at whatever hour of the day your little heart desires. There are thousands of “On Demand” videos to watch whenever you like, or you can sign up for live classes to participate with other riders all over the world. The coaches are energetic and motivating while the community is supportive and gets you engaged in an entirely new way. The bike itself is quality supremacy and customer service is always more than happy to assist you. If you’re looking  to add a new piece of equipment to your home gym this is definitely worth researching!

Vegan Nesselrode Pie

You’re probably sitting there scratching your head wondering what this pie could possibly consist of since the recipe seems to have vanished in recent years. I, myself had never heard of it until a dear “foodie” friend brought it up to me around the holidays. As soon as he mentioned candied fruit I was interested. This is because I am one of the few that actually adores fruitcake, but let me assure you right now that this pie is nothing like fruitcake – please don’t run away scared!

Traditionally, the pie is made using a flaky crust with a bavarian cream filling that has been lightened using egg whites before gently folding in the candied fruits. The candied fruits are often accompanied by chestnuts or sometimes even cauliflower. Other recipes have used lady fingers or chocolate wafers to create a more crumbly cookie crust. Sometimes there is a fluffy whipped topping placed over the bavarian cream filling with a dusting of chocolate shavings.

According to Larousse Gastronomique, The French food encyclopedia, there are a number of dishes containing chestnuts that were named after the 19th century Russian diplomat Count Nesselrode. There aren’t many other details as to why these dishes were named after him, but I think it’s safe to assume he was quite a big fan of chestnuts. Regardless of the why or how I am grateful that this recipe exists and that my friend introduced me to it! Its popularity in the US was due to a wonderful woman named Hortense Spier who served this at her restaurant as well as supplying them to a good many others in NYC during the 1950s. Back then this particular pie was as well known as lemon meringue, banana cream and coconut custard – whatever happened to poor nesselrode?!

Seeing that I have been eating and cooking vegan for a few years now I have been much more courageous in my attempts to “veganize” recipes that sound very… unvegan? The friend who told me about this retro recipe was so excited for someone to express an interest in nesselrode that he purchased an entire case of the pre-made candied fruits filling called “Raffetto’s Nesselro”. After each attempt of a different recipe he would give me a new bottle of the Nesselro in exchange for a few pieces of my experiments. Finally, we agreed that this last version was worth sharing with the world! He is truly hoping (and seems to believe) that this will begin a resurgence of Nesselrode Pie. I would love to be responsible for that, but for now I’m hoping someone out there will just give this a chance 🙂

This slideshow requires JavaScript.

Nesselrode Pie Recipe (Vegan)

Chocolate Cookie Crust

1.5 Cups Chocolate Cookie Grounds
5 Tablespoons Earth Balance (I use soy-free), melted

Filling

6 ounces silken tofu
1 cup almond milk
1 tablespoon agar flakes
1 tsp vanilla extract
.5 tsp almond extract
.5 tsp lemon juice
1 tablespoon cornstarch
1/3 cup granulated sugar
1 tablespoon unrefined coconut oil
10 oz Nesselro Fruit Topping, drained
1 tablespoon Dark rum
2 14 oz cans of Full Fat Coconut Milk
2 tablespoons powdered sugar

For the Chocolate Cookie Crust

1.) Heat oven to 350 degrees F.

2.) Place cookies into a food processor or blender and process until they are finely ground. No processor/blender? No problem! Put the cookies in a large ziplock bag and pound away with something like a rolling pin.

3.) Melt the first 5 tablespoons of Earth Balance Buttery Spread of choice (I always use soy-free).

4.) Transfer finely ground cookie crumbs into a large bowl, sprinkle a few shakes of cinnamon, pour the melted EB over the top, and stir until combined.

5.) Pour crumb mixture into a 9-inch pie pan and, using the bottom of a cup or your fingers, press firmly and evenly into the bottom and up the sides. Bake until fragrant, about 10 to 15 minutes. Remove to a wire rack to cool completely before filling.

For the Filling & Topping

1.) Whisk 1/2 cup almond milk with the cornstarch, set aside. Using a sieve drain your jar of Nesselro Fruit Topping, set aside.

2.) Pour the remaining 1/2 cup almond milk into a small saucepan with the Agar flakes and whisk over medium-high heat. Once the mixture begins to bubble turn the heat down to low-medium and allow to cook for 5 minutes. Stir occasionally to keep mixture from burning to bottom of the pan. Add the granulated sugar and allow to cook for another minute.

3.) Turn the heat back up to medium-high and slowly pour/whisk the almond milk cornstarch mixture in and bring to a light boil (about 30 seconds). Turn heat back down to medium-low and allow to cook for 5 more minutes. Stir occasionally to keep from burning.

4.) Remove pot from the heat and stir in remaining 1 tablespoon of EB buttery spread until completely combined. Set pot aside to cool for a bit while you prep the remainder of the ingredients.

5.) Place the tofu, extracts, lemon juice, and salt in a food processor or blender with the warm custard mixture and blend until fully combined. Transfer mixture to a large bowl and place in the refrigerator (or freezer if you want to eat this pronto!) to chill while you work on the coconut whipped cream (Coconut whipped cream recipe found below).

6.) Remove the bowl of custard and delicately fold in about a third of your coconut whipped cream. Gently fold in the Nesselro Fruit Topping with the dark rum, if using.

7.) Transfer the custard filling to your cookie crumb pie shell, spread the remaining coconut whipped cream on top, and finish the pie with a dusting of dark chocolate shavings.

Coconut Whipped Cream

1.) Place two cans of full fat coconut milk upside down in your refrigerator the night before. Place a large bowl in the freezer while you’re at it!

2.) Once you’re ready to open the cans of coconut milk turn them right side up again, open and pour out all of the excess liquid into a separate container (great to save for smoothies!).

3.) Extract the coconut cream from your cans of coconut milk into the large chilled bowl. Add 1-2 tablespoons of powdered sugar, to taste, and whip it all up using an electronic mixer with beaters!

*  Don’t forget to grate some chocolate shavings over the top! I used the Endangered Species Dark Chocolate with Espresso beans. The hint of coffee really intensifies the chocolate flavor. 

Virtual Vegan Potluck 2014 – Miche’s Winter-spiced Fruities

Fruitcakecookies

If these cookies look familiar it is because they are from my very first post to this blog a few years ago. I decided to use the recipe again for the potluck because I don’t think they got the love that I feel they deserve. The recipe has been adapted from Ina Garten’s “Fruitcake Cookies” because I absolutely loved them before making the switch over to vegan-eating. I also decided to go with a different name this time around because I have changed them a bit from Ina’s recipe, and I feel that the word “fruitcake” automatically sours a lot of people towards the recipe. This cookie actually doesn’t contain any candied fruit that you traditionally see in Fruitcake — it’s all dried fruits! I apologize for having to use the same photo as well, but John and I are away at a wedding all weekend in Rhode Island, and dummy (me) forgot to get the pictures off of the SD card in the camera back home.

Fruitcake Cookies:
Adapted from Ina Garten’s Fruitcake Cookies
 
Ingredients:
8 dried figs
4 ounces raisins
1 ounce dried cherries
1 ounces dried apricots, coarsely chopped
1 tablespoon pure maple syrup
2 tablespoons dry sherry
1 1/2 tablespoons freshly squeezed lemon juice
3 ounces chopped pecans
1/4 tsp salt
1 stick non-dairy butter (I used an Earth Balance buttery stick)
1/4 teaspoon ground cloves
1/4 cup sugar (I used an organic coconut palm sugar)
1/3 cup light brown sugar or turbinado sugar
1 chia egg (1 tbsp chia seed + 3 tbsp water – You can use a flax egg here, too!)
1 1/3 cups whole-wheat pastry flour

Directions:

Remove the tough stems of the figs with scissors or a small knife and coarsely chop the figs. In a medium bowl, combine the figs, raisins, cherries, apricots, maple syrup, sherry, lemon juice, pecans, and a pinch of salt. Cover with plastic wrap and allow to sit overnight at room temperature.

The next day…

Get your chia-egg (or flax-egg) ready so it can get gooey while you prep the rest of the ingredients!

In the bowl of an electric mixer fitted with the paddle attachment (or old-fashioned elbow grease), cream the non-dairy butter, cloves, sugar, and brown/turbinado sugar on medium speed until smooth, about 3 minutes. With the mixer on low speed, add the chia-egg and mix until incorporated. With the mixer still on low, slowly add the flour and 1/4 teaspoon salt just until combined. Don’t over mix! Add the fruits and nuts, including any liquid in the bowl.

Remove the dough from the bowl and place onto a 12 by 18-inch piece of parchment or waxed paper. Roll the dough into a log, 1 1/2 to 1 3/4-inch thick, making an 18-inch-long roll. Refrigerate the dough for several hours, or until firm (when I’m impatient I put it into the freezer for a little over an hour, hehe)

Preheat the oven to 350 degrees.

With a small, sharp knife, cut the logs into 1/2-inch-thick slices. Place the slices 1/2-inch apart on ungreased sheet pans and bake for 15 to 20 minutes, until lightly golden. I was able to get 28 cookies from this!

I hope that you all will give this recipe a try! These cookies make an appearance in my holiday cookie gift baskets every year, and they are always a hit 🙂

-Miche

Stay-Calm-Go-BackStay-Calm-Beginning-RedStay-Calm-Go-Forward

Been a while!

Phew-eeeeee! In my mind that came out in a Wild West-styled accent because I have been watching Deadwood recently. If you can stomach all of the sailor-talk, and the occasional lewd scene then I think you should check it out — the characters are great. I love me some Al Swearengen. : )

I can’t believe that so much time has gone by since I last posted anything. I sure am happy that I posted the pop-tarts recipe when I did; Otherwise, it wouldn’t have made it in time for Easter!

Sorry for such a delay in posts, but life has been quite hectic lately. Mostly for good reasons though so, I can’t complain. Due to some financial-aid confusions at the college that I attend I wasn’t going to be able to finish out my Bachelor’s degree, and it was keeping me in quite the little funk. I finally got that squared away (after months of worry), and I will be returning to school by the end of the month, hurray!

John left me alone for the last couple of days due to a business trip, and I’d like to say I accomplished a lot of exciting new recipes in his absence, but unfortunately not. One of our puppy dogs, Mochi, became pretty ill right before he was leaving for his trip, and I had to nurse her back to health the entire time he was gone. Thank goodness that some rice, bananas, and applesauce seemed to ease her tummy back to normal just in time for his return!

Come to think of it, I’m not entirely sure if I’ve made anything completely from my own jumbled mind since the pop-tarts. John’s birthday was a couple of days after my last post, and I made him the scrumptious lentil-walnut loaf, protein mashed potatoes, roasted brussels, and vegan gravy from my favorite vegan blog, Oh She Glows! He used to love meat loaf, mashed potatoes, and green beans (specifically, from the can… fancy, I know) on his birthday. I thought that this would make a wonderful new tradition, aaaaaand he loved it! For holidays I have started to always bring a savory and sweet dish for John and I to eat since other family members usually don’t understand why we would want to be vegan let alone help support it by making anything we could eat. Actually, I think it’s quite the opposite… John’s family seems to bring the fattiest most unhealthy dishes imaginable to family get-togethers, and then they look at us and give a forced little “Oh Sorry…” But, that’s ok! It just gives me more excuses to try out new recipes. This time I made the stuffed shells and raw berry crisp from the Oh She Glows blog.

Image

I am saddened to tell you that I don’t have a picture of the stuffed shells. A friend and I put two batches of them together the night before in order for her to bring half to her family’s house while I brought half to John’s family’s house. When I baked them the next day they just didn’t seem to share the same vibrance they did the night before so, I didn’t want to take any photos that wouldn’t do them justice. Of course, nobody at the party was into the tofu, but everyone adored the raw berry crisp.

Ah! That reminds me! I do have a recipe that I created myself! The raw berry crisp reminded me that I used the leftovers of the crisp on top of steel-cut oats the next morning (which I highly recommend.. it was phenomenal). I also used left overs from John’s birthday cake (Hummingbird cake.. *drool*) to make carrot cake oatmeal.

Image

I had a ton of leftover vegan cream cheese frosting, and I knew I didn’t want to waste it all. I was originally planning on making pancakes, but then oatmeal just hit me in an ah-ha moment.

Carrot Cake Oatmeal

Ingredients:

1/4 cup steel-cut oats (I soak them the night before then drain before cooking)
1/4 cup old-fashioned oats (I combine the different oats because John hates steel-cut oats, and I trick him into eating them this way, but feel free to use all steel-cut if you like : )
1 cup non-dairy milk (I used almond)
1 tbsp ground flax meal
1 tsp vanilla extract
1 tsp cinnamon
1/8 tsp nutmeg
1/8 tsp ginger
1/4 cup shredded carrot
1/4 cup crushed pineapple
2 tbsp raisins
1 tbsp almonds, chopped

Directions:
1.) Add the non-dairy milk to the steel-cut oats and turn the burner on medium-high. Stir in the ground flax, and wait for the mixture to bubble. Once it begins to bubble turn down to a simmer for about 10 minutes, stirring occasionally.
2.) Add in your carrots, pineapple, old-fashioned oats (if using), raisins, and spices and allow to simmer for about 7 more minutes (add more liquid if necessary).
3.) Turn off the heat, scoop your oatmeal into a bowl, pipe some frosting on top, and top it off with almonds! Other nuts likes pecans or walnuts would probably be lovely here too, but I just happened to have almonds on hand that morning.

The frosting recipe that I had left over called for 16 ounces of Tofutti cream cheese, 3 cups of powdered sugar, 1 tsp of vanilla, and a splash of non-dairy milk. Since most people don’t just have all of that lying around at their disposal I would assume you could mix a few tablespoons of the vegan cream cheese with powdered sugar or probably even maple syrup to get it to a sweeter liquid consistency and then decorate the top of your oatmeal. I wouldn’t leave it off though because it really makes the dish!

Easter Pop-tarts

Image

I didn’t even make these in the spirit of Easter, but they certainly look like something that belongs at an Easter gathering, don’t they?

The nerd inside of me absolutely loves video games, and cooking, playing games, or researching one of those two usually always take up any free time that I have, hehe. These little toaster cuties were created for a contest relating to my most current game obsession (Final Fantasy XIV). They were meant to look like a popular creature to the FF series called a chocobo. Sadly, I didn’t win, but I’m sure if the judges could have tasted them I would have been a winner! Here is what my official entry looked like:

Image

Most pop-tart recipes that I find online are filled with a lot of fake butter or shortening, which I’d like to stay away from unless I really need it. I decided to give a favorite pie dough recipe a go at being my pop-tart’s crust, and I must say that it worked wonderfully. Using that dough recipe (which doesn’t even require chilling) along with the simple filling made these pastries very simply and quick. This was my first attempt at royal icing, and all it turned out to be was a royal mess in the kitchen.

Pop-tart Pastry Dough (originally pie, but in disguise as a pop-tart here)
Recipe acquired from here: Happy Herbivore

Preheat Oven to 350 degrees

Ingredients:
1 ¼ cup whole-wheat pastry flour
1 whole banana, cold
1 tsp cinnamon
1 tbsp raw sugar (I used coconut palm sugar)
½ tsp salt

Directions:
1.)  Combine flour and banana (a slightly unripe, still greenish banana is best) in a food processor, pulsing until there are no whole banana pieces left and you can mold the mixture (think play-dough).
2.)  Transfer it out on to a clean surface and incorporate 1-3 tsp of warm water. You want enough water so that the dough is wet and not crumbly or dry, but not so wet it becomes sticky or hard to work with. Again, think, “play dough”. Roll it out using a glass (such as a drinking glass) until it’s very thin. I find picking the dough up and moving it as I roll it out help keep it from sticking to my clean surface.
3.)  I rolled my dough into about an 8×8 square, and then I sliced that into 8 smaller rectangles.
4.)  Place 1 tbsp of filling in the center of 4 of your dough-rectangles, and cover each of them with 1 of the bare rectangles. Using a fork close up each of the sides to create your classic pop-tart pastry. Prick the top a couple of times to allow steam to release while baking.
5.)  Carefully move your pop-tarts to a lined baking sheet and bake in the oven for 15 minutes or until the top is golden.

Peach Jam Filling

Ingredients:
1 ½ cups frozen peach slices
2 tsp sugar (optional, depending on how sweet the peaches are!)
1 tbsp Chia seeds
3 tbsp water

Directions:
1.)  Add everything to a small saucepan on the stove over medium heat. Once the peaches and chia seeds “gel” together remove the pan from the heat.
2.)  Empty the contents into a food processor, and pulse a few times to get a jam-like consistency.
3.)  Now your filling is ready for the pastries! I had a little leftover, but it was heavenly spread onto some Ezekiel toast the following morning. : )

Royal Icing
Recipe acquired from here: Royal Icing

Ingredients:
2 cups powdered sugar (I used organic)
1 ½ tbsp almond milk (or any non-dairy milk you prefer)
2 tsp light corn syrup
¼ tsp vanilla extract
food coloring of your choice

Directions:
1.)  Whip the sugar, almond milk, corn syrup, and vanilla until thick and smooth.
2.)  Divide the icing into small bowls to color individually and frost. Allow pastries to sit at room temperature to harden.

Notes: I don’t have a pastry bag for fancy decorating techniques – I simply used little zippy bags to fill with the colored frosting, snipped a tiny tip of a bottom corner, and used that as a decorating bag. 

Very Veggie Chili (with spice!)

Image

Ah, finally! John and I have been making this chili probably every weekend since we decided to begin eating vegan. There’s something very comforting about a nice big bowl of piping hot chili, and we’ve actually done quite a good job in repurposing it to keep it exciting (although, I am pretty boring, and I could most likely just keep eating it exactly the way it is!). We usually toss in spices from our cupboard until we reach the flavor that we were looking for, but the problem with that was that I couldn’t share it with anyone since I wasn’t positive of the exact measurements.

John wrote down the amounts of everything he plopped into the pot last weekend, but he wasn’t content with the flavor, and he instructed me not to share the recipe until it was perfect, ha! I made it again this week with all of the spices/measurements listed, and we both agreed it turned out quite yummy in our tummies. My favorite way to serve this is with the chili served inside of a roasted sweet potato along with crumbled tortilla chips on top. We have also made chili nachos, chili fries, chili “dogs”, and chili burgers with the left overs. If you happen to come up with any other spiffy dishes using chili please share!

Very Veggie Chili

Yields: 4-6 servings depending on how hungry you are! This nearly fills my 3 1/2 qt pot

Ingredients:

1 onion
1 green bell pepper
1 red bell pepper
1 tbsp chili powder
1/2 tbsp ancho chili powder
1 tsp chipotle chili powder
1/2 tsp smoked paprika
1 tbsp cumin
1 tsp roasted cumin (or more cumin if you don’t have roasted)
1 tsp garlic powder
1 tsp onion powder
sprinkling of salt (to taste)
2 15.5 oz cans of Black Beans
1 15.5 oz can Navy Beans
1 15.5 oz Can Kidney Beans
1 15.5 oz Can of whole kernel corn
1 28 oz Can of chunky tomato sauce

Directions:

1.) Chop your veggies to desired size; I usually mince the onion because John is not a fan of large pieces of onion, but I chop the peppers into large rustic-styled chunks.
2.) On medium-high heat sauté the onion in a splash of water or low-sodium veggie broth until translucent (a couple of minutes). Add in the peppers, and allow them to cook for a couple more minutes.
3.) Add the chunky tomato sauce along with all of the beans, and corn. Now you can toss in all of your spices then give it all a nice big stir. Bring the mixture to a boil, stir everything again to ensure it doesn’t stick to the bottom, turn the heat down to simmer, and cover for at least 20 minutes to allow all of the flavors to meld together. The longer this sits the better it will be!

Notes: I always look for reduced sodium or no-salt added cans when I am feeling too lazy to cook all the beans myself. There is a bit of spice in this chili therefore, feel free to adjust the measurements to your preferred taste. The ancho and chipotle chile powders are the culprits for creating the heat in this chile, and if that isn’t your thing go ahead and leave them out. You might want to add a little more of the plain ‘ol chile powder if you decide to do so 🙂

I also made a few desserts over the weekend, but I only snapped quick iPhone pics of two of them. On Friday I attempted black bean brownie bites that looked gorgeous, tasted pretty good, but were a bit mushy on the inside.

My buddy and I also worked on some strawberry cupcakes together. Again, they tasted all right, but they just didn’t seem to have that special something about them. The frosting also reminded me of acid-wash jeans… if they came in pink!

581892_10200730427411228_535517711_n

487768_10200721745234179_736419081_n

This weekend is going to be a busy one… it’s John’s birthday weekend, and I am going to make an entire vegan feast along with Hummingbird Cake!

Green Smoothie Love!

Image

My birthday was over the weekend, and it was a great one! The weather was beautiful for the first time in what feels like ages. The only problem with that is now I want Summer to be here oh so badly! The California girl in me can only withstand the chilly weather in the Northeast for such a long amount of time. This is actually the first year that I haven’t done much complaining in regards to the weather… the tiny sneak preview of beautiful Spring and Summer weather kind of ruined my sucking it up for this year, hehe.

I didn’t feel like making myself a birthday cake because I cook various dishes every weekend (well, weekdays too, but more exciting meals on the weekends), and I just thought it would be nice to sit back and let someone else do the cooking. In this case, it was the Vegan bakery that I’m not very fond of simply because Whole Foods (which is 1.5 hours away to begin with…) didn’t have any vegan cakes in stock on my birthday. John was kind enough to cook me one of my favorite dinners, which was our veggie chili stuffed into baked sweet potatoes. Mmm.. my mouth is watering just thinking about it! I’ll share the recipe once we get the measurements down pat 🙂 It’s one of those things where we just toss the spices in until it tastes to our liking.

Anywhos, since the weather has been mostly sunny lately it’s been causing me to crave iced drinks. I was so excited to order an iced americano from the coffee shop on my birthday, and it was great! Of course, I can’t afford to be doing that daily, nor does it help me out with many nutrients. I decided to make smoothies more often, and this one in particular is by far my favorite. It’s inspired by the Herbal Green Monster from the Oh She Glows blog, and it gives me the perfect reason to whip out my Vitamix every day now!

Good Morning Greenie

1/2 Cup Non-dairy milk (I use unsweetened almond milk)
2-4 ice cubes (I use 4 because I like it really icy)
1/2 frozen banana
1Tbsp Chia seeds
1/2 Green Pear
2 handfuls of Kale
small bunch of parsley
The juice of half of a lemon

Directions:
Let ‘Er rip in the blender 🙂

Pizza Dough all dressed up!

Pretzels
Blah, I certainly didn’t intend on allowing this much time to pass before posting these! The photos aren’t anything spectacular, but in my resolve to continue posting recipes that are not solely sweets I decided to go ahead and post these less than stellar photographs anyway.

Even though I missed a post last week I have still been busy every weekend creating new and tasty dishes for John, our best buddies, and myself. Over Oscar weekend we wanted to try out more finger foods, and after some brainstorming (or maybe it would be tummy-storming?) we decided upon pizza bites and jalapeno cheese pretzels (along with Mac & No cheese that we make nearly every weekend).

We actually found a recipe that we had planned on using to make the pretzels, but it seemed a bit silly to create more dough since I already had two of those left-over pizza dough balls sitting in my freezer. Being brave and adventurous (or just a little lazy.. but shh! We’ll go with brave!) I made the executive decision to sub in my whole-wheat pizza dough in place of the pretzel dough. Amazingly enough it worked like a charm! The pretzels came out perfectly, and I would definitely make them again. It’s a wonder all of the tantalizing treats this pizza dough is capable of creating.

Spicy Jalapeno Cheeze Pretzels:

Adapted from Fork and Beans
Ingredients:

1 Whole-wheat pizza dough ball
4 tablespoons canned or jarred jalapenos, chopped
6 tablespoons vegan cheese
3 cups water
½ cup baking soda

Preheat oven to 425 degrees

1.) Separate the dough ball into 6 like-size pieces and then roll each out into a 12-inch long cylinder-shape. Initially, I had been doing this on my cutting board until John couldn’t stand watching me take 10 minutes to finish one pretzel… He came over and whipped out the rest of them in less time by rubbing the dough between both of his hands (ever watched the workers at Auntie Anne’s? That’s exactly what he did, and I felt so silly afterwards). Shape the long pieces of dough into a pretzel, and set them aside.
2.) Boil 3 cups of water with ½ cup of baking soda in a large pot. Once the water is boiling use a slotted spoon to gently lower one pretzel at a time into the water for 30 seconds, and set them aside on a lined baking sheet.
3.) After all of the pretzels are done with their soak now you can dress them up with the toppings! I sprinkled about a tablespoon of vegan cheese on each pretzel and lightly sprinkled the chopped jalapenos on after that.
4.) Once all of your pretzels are dressed for success pop them into the oven for 10 minutes or until they are lightly browned.

The next treat that was requested by grumbling tummies of our household was pizza bites. The inspiration came from the Amy’s pizza snacks that we used to eat before going vegan (they have real cheese in them, boooo!).  I had originally planned on making a savory vegan pie dough and creating the pizza bites that way, but once again… that laz- I mean, kitchen courage popped up and told me to use my already prepped pizza dough! They were a little on the puffy side, but that definitely made them no less of a yummy treat!

Pizzapockets

Pizza Bites

Ingredients:
1 Whole-wheat pizza dough ball
½ can of Muir Glenn pizza sauce (or any sauce of your liking)
4 oz mushrooms, chopped
¼ cup TVP
¼ tsp dried oregano
¼ tsp dried basil
½ package of Vegan pepperoni

Preheat oven to 425 degrees

For the sauce:

1.) Toss your mushrooms into a small saucepan and cook for a couple of minutes until the mushrooms release their juices.
2.) Add your TVP (textured vegetable protein – I use this to give my sauces a “meaty” texture and for the added protein, of course!) and spices then cook for a couple more minutes.
3.) Add in the sauce, stir, and turn off the heat.

For the bites:

1.) Roll out your pizza dough into a large square (mine was about 12 x 12 give or take a little). Cut your dough into small squares that don’t need to be perfect, we ended up with about 36 total.
2.) Roll out each of the tiny squares when you’re about to fill them in order to get as much delicious filling into each without it overflowing. I placed 1 pepperoni and 1 tablespoon of sauce per pizza bite. Cover the bottom dough square with another square then use a fork to press down and seal the sides. Move to a lined baking sheet. Continue this method until all of your dough squares are gone.
3.) Bake the pizza bites for 12-15 minutes until the tops are lightly browned.

As you can see from the picture, it took us a while to figure out the best method to making these. We had a lot of blowouts because we originally made 18 larger squares, placed the filling on one side, and then we pulled the bare side over the filling. This was a pretty sloppy method, and it wasn’t very effective. It was much simpler to make double the amount of dough squares and cover the bottom layer with the top before sealing off the sides.

I hope that you enjoy these tasty little treats, and that they inspire you to experiment in creating new ones out of old recipes : )!

Whole Wheat Pizzas

Image

I am determined to post something on here that is not a dessert or sweet recipe! So determined in fact, that while I was prepping our dinner for tonight I decided to go ahead and take a quick snap of our weekly veggie pizza. It’s not cooked in any of the pictures, but all of the vegetables atop of the crust looked so yummy and bright that I felt it wouldn’t matter anyways.

We often made this same pizza for our dinners before we began eating vegan, but a little cheese used to accompany all of those lovely veggies. We honestly haven’t missed the cheese at all, and now I just sprinkle a little nutritional yeast on top when I’m feeling “cheezy”. I’ve even used the basil cashew cheese from “Oh She Glows” as a base in place of the sauce, and that was absolutely delightful.

The reason that this little pizza visits our dinner menu multiple times a month is because it’s so easy to prep, make, and on top of all of that it’s quite healthy!

Whole Wheat Pizza Dough:

I always separate this into 3 dough balls that make 12-inch pizzas (thin crust)

Ingredients:

2 cups whole-wheat flour

2 cups bread flour

½ tsp salt

2 tbsp extra virgin olive oil

2 cups water

1 packet of yeast (I use Hodgson Mill’s rapid rise)

1.) Heat ½ cup of the water to 110-115 degrees, and then empty the contents of the yeast packet into the water. Allow the yeast mixture to rest for 5 minutes

2.) While your yeast is proofing combine the flours and salt into a bowl (I used a stand-mixer with the dough hook attachment).

3.) Once the 5 minutes are up add 1 tbsp of the extra virgin olive oil to the water along with the remaining 1 ½ cups of water. Add the wet ingredients into the dry and stir to combine. Once all of the dry is incorporated into the wet ingredients knead for 5 minutes.

4.) Remove the dough from the bowl (if using a stand-mixer), form into a cute little dough ball, coat the bowl with your remaining 1 tbsp extra virgin olive oil, and then place your dough ball back into the bowl. Cover the bowl, and let this sit at room temperature for about 2 hours (I have honestly left this thing out for nearly 6 hours before on accident, and it was fine!).

5.) Now, here comes the fun part – time to punch that dough! Punch the dough down then scoop it out of the bowl with your hands. Separate the dough into 3 even balls, wrap in plastic wrap, and store in the freezer for 2-3 months. When you’re ready to use your dough let it sit in the fridge overnight to thaw or on your counter for a couple of hours. If you plan on using them sooner, you can store these in refrigerator for about 5 days.

As for toppings… the sky is the limit, really. I make this veggie pizza as often as I do simply because it’s such a cinch, we happen to always have the ingredients, and it’s good for us too! If you’re really interested in what exactly is on this beauty I used:

  • 3 tbsp Muir Glen Pizza Sauce
  • 2 tsp garlic powder
  • 2 tbsp nutritional yeast
  • 2 small bunches of broccoli
  • ¼ of a red bell pepper
  • 2 mushrooms
  • Large forkful of banana peppers
  • Sprinkle of cayenne pepper

Then, I baked it at 425 degrees for 13 minutes 🙂

 Image

I figure I can’t depart without (even if it’s a crappy one..) a picture of those cuh-ray-zee pizzas I mentioned from the weekend. No need to worry, that Mac & Cheeze had no real cheese, and the little hot dogs were slices of the lightlife brand; which I highly recommend! They have made John’s transition into vegan eating much easier seeing that I can bribe him with fake tubes of meat as a special treat every once in a while (haha!).

 Image